
Affiliate-Links: Bei Links mit * erhalten wir eine Provision. Für dich ändert sich der Preis nicht. Details in der Datenschutzerklärung.
KI-Assistenz — KI-Hinweis: Dieser Beitrag wurde von DadChecks Editorial KI-gestützt erstellt und von den automatisierten Prüfagenten der Redaktion geprüft. Keine Person hat den Beitrag selbst geschrieben oder selbst getestet. Es handelt sich um eine Recherche, nicht um einen Praxistest: Es gab keine eigene Testhardware, keine eigenen Messungen und keine eigene Kaufentscheidung.
A refurbished office mini PC makes a good virtualization host, and Proxmox VE makes it easy to set one up. The hard part is the ten installer decisions and the four ways the first boot leaves the machine unreachable.
Part 2 of a three-part series on a budget home lab. Part 1: Raspberry Pi 5 vs Used Mini PC: Which Makes the Better Budget Home Server?. Part 3: Back Up and Restore a Proxmox Home Lab. This part turns the mini PC into a virtualization server. If the hardware is already chosen and you just want it running well, the recovery plan covers the host once Proxmox is up. The network the host sits on is covered in Build a Smart-Home-Ready Network.
What this article covers
Objective: a working Proxmox VE 9.2 installation on a refurbished x86 mini PC: predictable storage, working networking, one VM running.
Requirements: a 64-bit x86 machine with hardware virtualization, a spare disk, a USB stick, and an Ethernet port on the browsing network.
Applicable versions: Proxmox VE 9.2 (21 May 2026, Debian Trixie, kernel 7.0, QEMU 11.0). Support policy: “Proxmox VE versions are supported at least as long as the corresponding Debian version is supported by the Debian Security Team, i.e. approximately 3 years after its initial release” Known issues below are 9.2-specific.
Prerequisites: the Proxmox VE 9.2-1 installer ISO, SHA256SUM 4e88fe416df9b527624a175f24c9aa07c714d3332afb1ee3dbf3879573ef2c6c; a USB stick of 8 GB or more; a backup of the target disk, because “All existing data on the selected drives will be removed during the installation process”
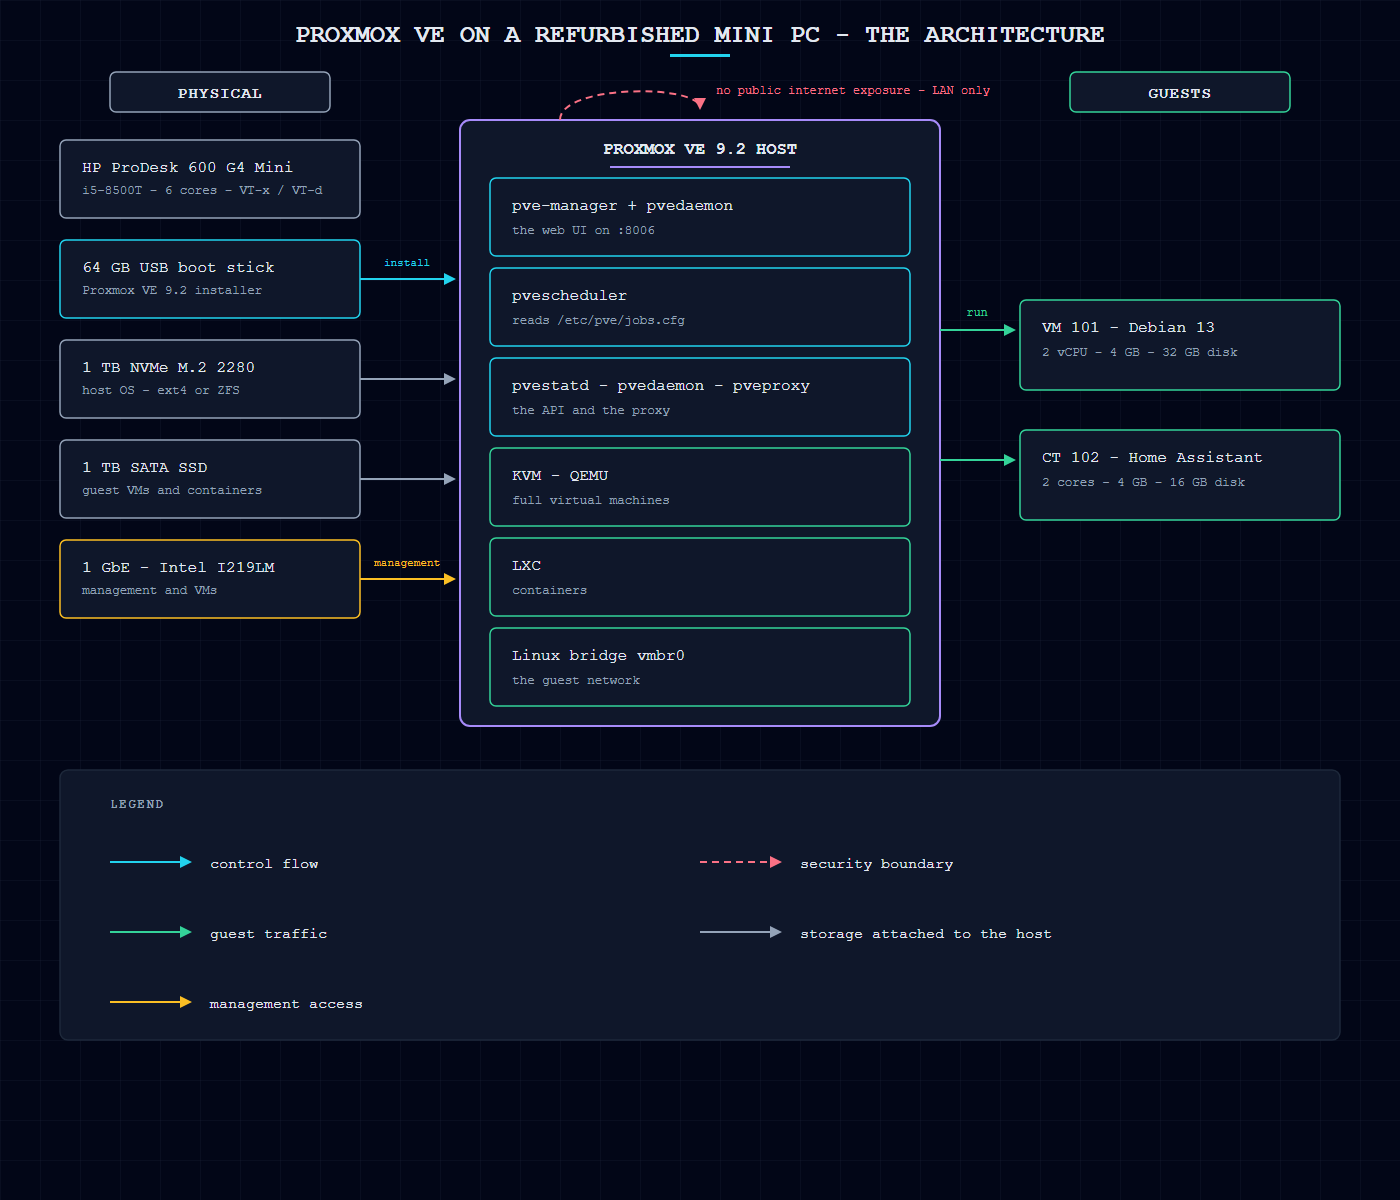
What Proxmox VE actually is
Proxmox VE is a Linux distribution and management interface for running VMs and containers on one host, with a web API that “exposes the whole Proxmox VE API on TCP port 8006 using HTTPS” The admin guide states that “The source code of Proxmox VE is released under the GNU Affero General Public License, version 3.”
Two consequences: the software itself costs nothing to use, and this is not a general-purpose Linux host — everything runs in a VM or container, and host packages conflict with Proxmox upgrades.
Hardware requirements, and the two you actually have to check
Documented minimum: a 64-bit x86 CPU (Intel 64 or AMD64) or a 64-bit ARM CPU, “1 GB RAM, plus additional RAM needed for guests” a hard drive and one network card. Recommended: “2 GB for the OS and Proxmox VE services, plus designated memory for guests” and “Fast and redundant storage, best results are achieved with SSDs”
- Hardware virtualization. Required: “an Intel VT or AMD-V capable CPU and motherboard for KVM full virtualization support” Check with
egrep '(vmx|svm)' /proc/cpuinfo— “To check if your CPU is virtualization compatible, check for the vmx or svm tag in this command output” An empty result means no KVM, and no VM. - IOMMU, but only for PCI passthrough. “For PCI(e) passthrough, the CPU and motherboard need to support an input/output memory management unit (IOMMU): Intel VT-d or AMD-Vi on x86” Not needed for Proxmox or ordinary VMs.
Everything else is a judgement call. UEFI is not mandated for x86 hosts, only for arm64: “An arm64 host must boot through UEFI and describe its hardware through ACPI” Secure Boot is separate: “Secure boot needs to be disabled when booting an installer prior to Proxmox VE version 8.1”
Before you install: the disk and the filesystem
The installer can partition the target with ext4, XFS, BTRFS (preview) or ZFS; the filesystem “defaults to ext4” For ext4 or XFS it also uses LVM, creating “a Volume Group (VG) called pve, and additional Logical Volumes (LVs) called root, data, and swap”
- Never put ZFS on a hardware RAID controller. “ZFS on top of any hardware RAID is not supported and can result in data loss.” A used office PC may have one even in one-disk mode; then use ext4 or XFS directly, or disable it in the firmware.
- ZFS needs memory you probably do not have spare. “approximately 1GB of memory for every TB of used storage” on top of the 2 GB baseline, and “additional memory is required; approximately 1GB of memory for every TB of used storage” for Ceph and ZFS. A 16 GB machine running ZFS on one 1 TB disk wastes memory; ext4 on LVM is the boring default.
The installation, step by step
Boot the installer and pick “Install Proxmox VE (Graphical)” The menu also offers “Install Proxmox VE (Terminal UI)”: “The Terminal UI option can be used in case the graphical installer does not work correctly, for example due to driver issues.” On a graphics hang, use nomodeset, which “prevents the Linux kernel from loading any graphics drivers”
- EULA and target disk. Destroys data; no undo.
- Filesystem and disk selection. Pick ext4 unless you have a reason; the Options dialog sets the filesystem and LVM knobs
hdsize, which “Defines the total hard disk size to be used”, anddatasize, whose thin pool appears only “if datasize is bigger than 4GB” - Location, time zone, keyboard layout. The location picks a nearby download server: “The location is used to select a nearby download server, in order to increase the speed of updates.”
- Root password and email. “The password must consist of at least 8 characters. It’s highly recommended to use a stronger password.” The installer’s own guidance: “Use a minimum password length of at least 12 characters.”
- Network. The installer proposes “the network settings it obtained via DHCP on the untagged network” Override it; see the next section.
- Summary, then install. “Please re-check every setting and use the Previous button if a setting needs to be changed.”
Networking: what vmbr0 is and why the GUI can lock you out
The configuration lives in /etc/network/interfaces. The one concept to know is the bridge: “A Linux bridge interface (commonly called vmbrX) is needed to connect guests to the underlying physical network. It can be thought of as a virtual switch which the guests and physical interfaces are connected to.” Bridges are “like physical network switches implemented in software”; a host can have up to 4094.
The installer “creates a single bridge named vmbr0, which is connected to the management interface selected during the installation”; by default the management IP sits on the bridge. Changing the management network in the web interface is the classic way to lose access to your own hypervisor: the GUI writes to a temporary file, not to /etc/network/interfaces, and the change applies only on reboot. Without a reboot, use ifupdown2, “default for new installations since Proxmox VE 7.0” apply it in the GUI; if you edited the file by hand, run ifreload -a
Two rules: keep the management IP on the browsing subnet, and have keyboard access if you change it. If the configuration goes wrong, the ISO’s “Advanced Options: Rescue Boot” mode exists: it “searches all attached hard disks” and boots an installation it finds.
A bond set up during installation makes the bridge connect to the bond instead of a single NIC; a VLAN tag makes it VLAN-aware. Names follow vmbr[N], “where 0 ≤ N ≤ 4094”; any alphanumeric name up to 10 characters works.
The web interface, and the first thing to do in it
After the reboot, open https://your-ip:8006. The default login is root with your installation password; the realm is PAM. The self-signed certificate warning is expected.
The post-install checklist is short: “Upload your subscription key to gain access to the Enterprise repository”, “Check the IP configuration and hostname”, “Check the timezone”, “Check your Firewall settings” The software needs no subscription; a key buys the Enterprise repository, which “is the recommended repository and available for all Proxmox VE subscription users. It contains the most stable packages and is suitable for production use”, while the no-subscription repository “can be used for testing and non-production use. It’s not recommended to use this on production servers”
Without a key, disable the Enterprise repository: add an Enabled: no line to the entry in /etc/apt/sources.list.d/pve-enterprise.sources — “This will prevent error messages if your host does not have a subscription key. In that case, please configure the pve-no-subscription repository.” Keep the base Debian repositories — “you will always need the base Debian repositories in addition to a Proxmox VE Proxmox repository”
Storage planning
On a default ext4-on-LVM install the local datastore is directory-type storage on the root filesystem: “VM images → images/<VMID>/, ISO images → template/iso/, Container templates → template/cache/, Backup files → dump/, Snippets → snippets/, Import → import/“
| What you are storing | Where it goes by default | What to do about it |
|---|---|---|
| Guest disks | On local, as vm-<VMID>-<NAME>.<FORMAT> | Keep them on SSD. |
| ISO images | local → template/iso/ | Check the GUI’s Content view, or run pvesm list local --content iso |
| Container templates | local → template/cache/ | Downloaded on demand; keep one or two. |
| Backups | local → dump/ | Fills your disk; Part 3 moves it off the host. |
| Proxmox configuration | /etc/pve/ | Includes jobs.cfg and domains.cfg; back up separately. |
Two storage rules. Thin provisioning: “A number of storages, and the QEMU image format qcow2, support thin-provisioning. With thin provisioning activated, only the blocks that the guest system actually use will be written to the storage” The warning: “If a storage runs full, all guests using volumes on that storage receive IO errors. This can cause file system inconsistencies and may corrupt your data. So it is advisable to avoid over-provisioning of your storage resources.”
Snapshots need thin provisioning and discard: “For efficient support of snapshot-as-volume-chain, the backing storage must support thin-provisioning and discard.” fstrim keeps that honest — it “releases data blocks that the filesystem isn’t using anymore”
Creating your first VM
The header has a “Create VM” button; path: Datacenter → Node → Guest → Create VM. The General tab sets node, VM ID, name and OS type: “When creating a virtual machine (VM), setting the proper Operating System(OS) allows Proxmox VE to optimize some low level parameters. For instance Windows OS expect the BIOS clock to use the local time, while Unix based OS expect the BIOS clock to have the UTC time.”
First-VM checklist
- Node, VM ID, name and OS type set; OS type sets the clock mode.
- Firmware. SeaBIOS is the default and “a good choice for most standard setups” OVMF only for PCIe passthrough; then note that “In order to save things like the boot order, there needs to be an EFI Disk. This disk will be included in backups and snapshots, and there can only be one.”
- Machine type. Intel 440FX by default; Q35 “also provides a virtual PCIe bus”
- SCSI controller. Default
lsi;virtio-scsi-pcifaster on SSD.virtio-scsi-singlelimits concurrency to one queue. Usevirtio-scsi-pci, orlsiif the disk moves hosts. - CPU type. UI default
x86-64-v2-AES, backend defaultkvm64; ladder:kvm64(x86-64-v1) through v2, v2-AES, v3, v4. On an i5-8500Tx86-64-v3is available;hostfastest but only sensible if “you don’t care about live migration or have a homogeneous cluster” - Memory. Cores and memory from what the host can spare after the 2 GB baseline; CPU type
x86-64-v3orhost. Balloon driver on by default: “The balloon driver is enabled by default, unless it is explicitly disabled by setting the value to zero.” - Disk. Discard = on (
discard=on), SSD emulation = on (ssd=1), size you can over-provision.ssd=1reports the disk as solid-state. - Network device on
vmbr0, model VirtIO. In NAT mode “each virtual NIC will only communicate with the QEMU user networking stack” — wrong for a server on your LAN. - QEMU Guest Agent ticked, and installed in the guest; it “is a service which runs inside the VM, providing a communication channel between the host and the guest”, making clean shutdowns and consistent snapshots possible.
- Boot order: ISO first, disk second, so installation completes on reboot.
First-boot verification
Four checks. Reach the interface: browse to https://your-ip:8006 and log in. Run the built-in benchmark: “To get an overview of the CPU and hard disk performance on an installed Proxmox VE system, run the included pveperf tool.” Confirm the datastore shows your ISO and guest disk. Confirm the network: the guest gets a LAN address and the host reaches it. If the network is wrong, the fix for a hand-edited file is ifreload -a; if the host is unreachable, boot the ISO into Rescue mode.
Common installation failures
| Symptom | Cause | What to do |
|---|---|---|
| Installer does not see the disk | RAID controller driver mismatch (a published 9.2 issue): “Kernel 7.0.2-6, shipped with the ISO installer, has compatibility issues with RAID controllers using the megaraid_sas drivers and certain NVMe drives in JBOD mode.” Fixed in kernel 7.0.14-15; the vendor advises “use the Proxmox VE 9.1 ISO for installation and perform an upgrade to Proxmox VE 9.2 afterwards” | Disable the RAID controller in the firmware, or use a supported one; no ZFS on hardware RAID. |
| Installer hangs on a black screen | Graphics driver problem. | Boot the Terminal UI installer, or add nomodeset |
| Installation fails outright | Usually a requirement not met. | Documented triage: “check out specific errors on the second TTY (CTRL + ALT + F2) and ensure that the system meets the minimum requirements” |
| Host boots, web interface never appears | Bootloader problem, or wrong network configuration. | Use Rescue Boot from the ISO — it “can be useful if there are problems with the bootloader (GRUB/systemd-boot) or the BIOS/UEFI is unable to read the boot block from the disk” |
grub prints disk | A UEFI+LVM upgrade path; the wiki scopes it to “PVE 7.4 (or earlier) hosts with their boot disk on LVM / PVE 8 hosts that have their boot disk on LVM, boot in UEFI mode and were upgraded from PVE 7” | Repair from a chroot: proxmox-boot-tool status, then proxmox-boot-tool reinit, or reinstall the bootloader on the ESP (512 MB, EF00). |
| Windows guest freezes at random | A 9.2 known issue with Virtualization-based Security: “On Intel hosts, Windows 11/2022/2025 guests using the host CPU type and Virtualization-based Security (VBS) enabled may occasionally freeze” | A fix exists in qemu-server 9.2.0, which “introduces a new machine version” Update the host first. |
Security for a home network
- Do not expose port 8006 to the public internet. Keep it on the LAN; use a VPN for remote administration. The firewall can “filter network packets on any VM or container interface”, and “Common sets of firewall rules can be grouped into security groups”
- Turn the firewall on. The setting most people leave off: “enable firewall (cluster-wide setting, default is disabled)” nftables backend: Host → Firewall → Options, or
/etc/pve/nodes/<node_name>/host.fw - Restrict who can connect. ACLs live in
/etc/default/pveproxy, withALLOW_FROM,DENY_FROMandPOLICY.LISTEN_IPrestricts the socket to an internal interface “and thus have less exposure to the public internet” But “It is not recommended to set LISTEN_IP on clustered systems” - Enable two-factor authentication for root. TOTP, WebAuthn, single-use recovery keys, enforceable per realm. Users “will be locked out after too many failed 2nd factor login attempts”
- Use separate accounts, not root, for day-to-day work. Role-based permissions: “Groups are the preferred way to organize access permissions. You should always grant permissions to groups instead of individual users.” Realms: PAM, Proxmox VE Authentication, Active Directory, LDAP, OpenID Connect.
Two defaults to change on day one: the firewall is off, and the proxy “listen on the wildcard address and accept connections from both IPv4 and IPv6 clients” until you say otherwise.
Limitations
- A documented procedure, not a tested one. Written against the Proxmox VE 9.2 documentation and verified against it; nobody installed Proxmox on a mini PC while writing it.
- No interface screenshots. Drawn diagrams instead: Proxmox publishes no public demo instance, and a fabricated screenshot is worse than none.
- Cluster features are out of scope. A single-node home lab; the bridge, firewall and proxy settings have cluster-wide caveats.
- The BIOS/UEFI section is deliberately thin. Firmware menus are manufacturer-specific; check your manual.
References
- ISO installer (9.2-1, 1.71 GB, SHA256SUM): proxmox.com ISO downloads
- Checksum: proxmox-ve_9.2-1.iso.sha256
- Roadmap: pve.proxmox.com/wiki/Roadmap
- Installation: chapter-pve-installation.html
- Storage: chapter-pvesm.html
- GUI: chapter-pve-gui.html
- Firewall: chapter-pve-firewall.html
- Host admin: chapter-sysadmin.html
- FAQ: chapter-pve-faq.html
- User management: pve.proxmox.com/wiki/User_Management
- Grub recovery: pve.proxmox.com/wiki/Recover_From_Grub_Failure
- System requirements: pve.proxmox.com/wiki/System_Requirements
- Proxmox
pveproxymanual: pveproxy.8.html - Proxmox
qmmanual: qm.1.html - Ports: pve.proxmox.com/wiki/Ports